")
CNC G Codes for Beginners: Practical Guide, Commands, and Examples
Author: Radonix CNC Control Systems Team – CNC Controllers & Motion Control Specialists
If you’re just getting started with CNC G Codes, you’re in the right place. Shops that streamline toolpaths, feeds, and speeds with clean, well-structured CNC G Codes can achieve meaningful reductions in cycle time, rework, and material waste.
This beginner-friendly guide explains what CNC G Codes are, how they work, and how to write them correctly—plus plenty of G-code programming examples and practical tips tailored for hobbyists, small manufacturers, and entry-level engineers using Radonix CNC controllers.
We’ll cover the fundamentals, basic G-code commands, real-world programming workflows, common mistakes to avoid, and how modern CNC programming continues to evolve with CAM automation and efficiency-focused machining practices.
What Are CNC G Codes? Fundamentals Explained
CNC G Codes are the core programming instructions that tell your machine how to move. Each “G” command sets a mode or motion type—linear moves, arcs, plane selection, units, and more—allowing you to transform CAD/CAM intent into precise, repeatable toolpaths on mills, lathes, routers, lasers, and beyond.
A short history and context
- Origin: G-code has roots in standardized numerical control from the mid-20th century, evolving into formats such as ISO 6983.
- Purpose: It’s the language that specifies motion and machining strategies, whether you’re using CNC milling G codes for 3-axis contouring or lathe G codes for turning and threading.
- Ecosystem: You’ll see variations across controllers (e.g., Fanuc G codes), but the core concepts translate well between brands with minor adjustments to syntax and modal behavior.
G-code vs. M-code
- G-code: Governs motion and preparatory functions (e.g., G00 rapid, G01 linear feed, G02/G03 arcs, G90/G91 positioning modes).
- M-code: Handles machine-level functions (e.g., M03 spindle on clockwise, M08 coolant on, M06 tool change).
Think of M codes as machine controls and G codes as motion logic within your CNC codes program.
Why beginners should care
- G-code syntax is straightforward once you know the patterns: a block-based program, line by line, with modal states that persist until changed.
- Knowing basic G-code commands helps you read and tweak CAM output safely, hit tolerance, and prevent crashes—critical skills whether you’re a maker or managing a small production cell.
- If you’re using Radonix CNC controllers, understanding CNC G Codes gives you the confidence to pair powerful control features with efficient toolpaths.
For a deeper primer on controllers themselves, see: How CNC Controller Works: Full Guide to Precision Control on the Radonix blog.
Essential Basic G-Code Commands for Beginners
Below are the foundational CNC G Codes you’ll use daily. Keep this table handy as a quick-reference sheet. These basic G-code commands appear across many controllers, with minor syntax differences. Always check your machine’s manual.
| Command | Description | Example Use Case |
| G00 | Rapid traverse (non-cutting move) | Move quickly to a safe clearance: G00 X0 Y0 Z5 |
| G01 | Linear interpolation (cutting move) | Straight-line cut at feed: G01 X50 Y0 F300 |
| G02 | Clockwise arc | Circular pocket CW: G02 X0 Y0 I-10 J0 |
| G03 | Counterclockwise arc | Circular pocket CCW: G03 X0 Y0 I10 J0 |
| G17/G18/G19 | Plane selection (XY/XZ/YZ) | Set plane for arcs: G17 for milling on XY |
| G20/G21 | Units (inch/mm) | Metric programming: G21 |
| G28 | Return to machine home | Safe return after op: G28 Z0 |
| G40/G41/G42 | Cutter comp off/left/right | Profile with tool radius comp: G41 |
| G54–G59 | Work coordinate systems | Set part zero: G54 |
| G90/G91 | Absolute/incremental positioning | Absolute: G90, step moves: G91 |
| G94/G95 | Feed per minute/per revolution | Mills: G94, Lathes: G95 |
| G81–G89 | Drilling cycles (canned) | Peck drilling: G83 Z-15 R2 Q2 F120 |
| G96/G97 (lathe) | CSS on/off (constant surface speed) | G96 S180 m/min; G97 S1200 RPM |
| G98/G99 | Return levels in cycles | G98 return to initial; G99 return to R |
Notes
- The combination of G17/G18/G19 and G02/G03 matters: your plane defines arc interpretation.
- With cutter comp (G41/G42), give a proper lead-in/lead-out so the control can offset the tool without gouging.
- Many CNC codes are modal: once set (e.g., G01), they stay active until you change them.
G Code Programming Examples: Hands-On Tutorials
This section is your mini CNC programming tutorial with G-code programming examples you can adapt. Always run in air first, use a safe Z, and verify units and work offsets.
Example 1: Straight line facing cut (mill)
Goal: Face a small aluminum block front edge at Z = -0.2 mm depth.
Steps:
- Set safety line and modes: metric, absolute, XY plane.
- Call work offset G54 and select the tool.
- Rapid to clearance, then feed into the cut.
- Retract and return home.
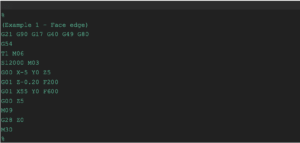
Key learning:
- G21 sets metric; G90 sets absolute positioning.
- Use G00 only for clearance moves. Use G01 with feed to cut.
Example 2: Circular pocket with helical interpolation (mill)
Goal: Mill a 20 mm diameter, 3 mm deep pocket.
Steps:
- Start above the pocket center.
- Ramp in with a helical path using G03 and I/J for center.
- Spiral to full diameter and depth.
- Finish with a cleanup circle.
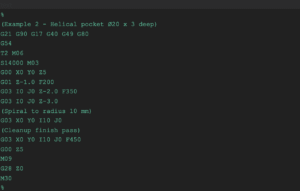
Tips:
- Some controls prefer R for arc radius; others prefer I/J relative to start.
- Maintain a constant step-down per revolution to avoid tool overload.
Example 3: Drilling pattern with a canned cycle (mill)
Goal: Drill 4 holes on a rectangular pattern with a G81 cycle, 10 mm deep.
Steps:
- Set R-plane and cycle parameters.
- Use G98 or G99 depending on return level preference.
- Position to each hole and call the same cycle.
- Cancel with G80.
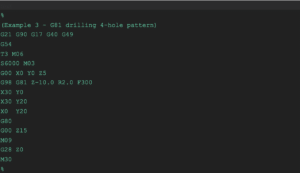
Notes:
- G98 returns to the initial Z after each hole; G99 returns to the R-plane. Choose based on your clearance needs.
- Replace G81 with G83 peck drilling when chips pack.
Example 4: External threading on a lathe (G76)
Goal: Cut an M20 × 2.5 external thread using a standard threading cycle.
Steps:
- Set CSS if desired, and G95 for feed per revolution.
- Define thread parameters with G76 (format varies by controller).
- Start at safe Z, then execute the cycle.
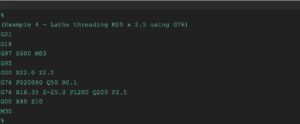
Threading reminders:
- Lathe G codes often differ from mill codes; check your machine’s G76 syntax.
- G95 ensures feed is per revolution—critical for synchronization.
- For Fanuc G codes, verify the two-line G76 format vs. one-line variants.
Common Mistakes in CNC G Codes and How to Avoid Them
Avoid these frequent pitfalls when writing or editing CNC G Codes:
- Absolute vs. incremental confusion: G90 vs. G91 mix-ups cause runaway moves. Confirm your positioning mode at program start.
- Plane selection errors: Using G02/G03 arcs with the wrong plane (G17/G18/G19) produces unexpected paths.
- Units mismatch: CAM posts in inches (G20) but the machine expects mm (G21), or vice versa. Set units explicitly.
- Missing tool length or wear offsets: Activate the correct length (e.g., G43 Hxx) and cutter comp (G41/G42) with proper lead-in/out.
- Unsafe rapids: Always retract to a known safe Z before lateral rapids, and use clearance planes with G98/G99 in cycles.
- Incorrect I/J or R in arcs: Understand your controller’s arc center conventions and quadrants.
- Feed mode mistakes: Mills often use G94; lathes commonly use G95 for threading. Wrong feed mode can ruin surface finish or the tool.
- Modal “leftovers”: Cancel cycles with G80; reset states at program end; and clear cutter comp with G40.
- No dry run: Always verify with a graphical simulation and a high-Z air cut on the real machine.
How CNC G Codes Are Evolving with AI and Efficiency
AI-driven CAM and automation
Modern CAM increasingly leverages AI to propose toolpaths that reduce air cutting, stabilize engagement, and auto-tune feeds and speeds. The result is more efficient CNC G Codes with fewer manual edits and improved tool life.
Expect tighter integration between CAD, CAM, and the controller HMI—automated probing routines, smarter rest machining, and post-processed G-code programming examples that are validated for your machine’s kinematics.
Sustainability and energy-efficient programming
- Shorter rapids, optimized stepdowns, and constant-tool-engagement strategies reduce spindle load and power consumption.
- Minimizing retracts and non-cutting moves saves energy and time. Small changes in your CNC G Codes—like better entry strategies and reduced air time—compound across batches.
- Tool life tracking and wear-aware feeds lower scrap rates and consumable waste.
Radonix innovations and your workflow
Pair intelligent CAM with robust control hardware for the best results.
Conclusion
Mastering CNC G Codes gives you control, speed, and confidence.
Start with basic G-code commands, learn how modal states work, and practice with small edits to CAM output.
Use the G-code programming examples in this CNC programming tutorial as a foundation—and then build from there with probing, cycles, and compensation.
Whether you’re machining prototypes at home or scaling production, clean, well-structured CNC G Codes reduce cycle time, improve surface finish, and prevent costly mistakes.
Contact Us:
- E-Mail: info@radonix.com
- Phone: +90 (553) 920 5500